Commissioning
Connecting the device to a laptop or PC
Connect the device with an appropriate power source, see chapter 6.1 Power supply.
Connect connection ETH2 on the device via a patch cable with a PC or laptop. (Please note: A DHCP client runs on ETH1 by default.)
Configuration of the network adapter of the PC
Recommendation for use
Recommendation for use: The procedure described in the following was prepared using the Microsoft Windows operating system as an example. If you are using another operating system, the paths and properties described here may vary.
On your PC/laptop: Open the properties of your network adapter used for establishing the connection and enter the following:
-
IP address: 192.168.0.100 (The last set of digits must be a number between 1 and 253. In this example: "100".)
-
Subnet mask: 255.255.255.0 (Some input masks require the input of the short notation /24 instead.)
Confirm your entries by clicking on OK.
Calling up the device web interface
Recommendation for use
Recommendation for use: The web interface of the device was optimised for the Mozilla Firefox browser. There may be functional limitations if a different browser is used.
Start up your web browser. In the browser’s address bar, enter the following IP address and then confirm with Enter
http://192.168.0.254
Once the IP address has been entered with success, the login prompt appears. The default settings are:
User name: admin
Password: admin
Confirm your entries by clicking on OK. The device web interface then appears:
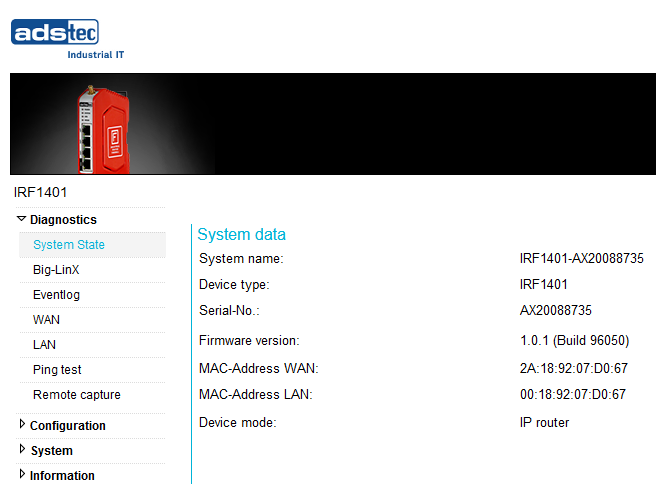
Recommendation for use
Hint: If you cannot establish a connection, check the proxy and local firewall settings. Often, local subnet addresses (e.g. 192.168.x.x) are also diverted to a proxy server.
In this case, it is possible to select the "Bypass proxy server for local addresses" option to enter the address in question.
Follow the instructions of the commissioning wizard.
Startup mode
During this initial configuration, the device is in a special commissioning mode. Certain functions and interfaces of the device are deliberately restricted or specially configured to ensure that safety-critical configuration steps are implemented and to prevent unauthorised access.
-
In commissioning mode, the device does not route network packets between network interfaces. This prevents unintended communication between, for example, WAN and LAN.
-
The ads-tec Discovery Tool is only fully functional in commissioning mode. It allows you to set the IP address and detect devices in the network.
After completion of commissioning mode, i.e. in normal operation, the firmware prevents
-
sets IP addresses
-
and API calls that require authentication (e.g. password changes).
ADS-TEC Discovery Tools The ADS-TEC Discovery Tool uses a special Ethernet protocol with the EtherType number 0x890E. This software interface is activated by the system and cannot be deactivated.
Access options
The functionality of this interface is divided as follows:
Commissioning mode In commissioning mode, device settings and system parameters can be read and changed via this interface. Access requires the entry of a valid user name and password.
After commissioning (normal operation) Access via this interface is also possible in normal operating mode. However, only read access to the following information classified as public is permitted without a password:
-
Serial
-
MAC address
-
Hardware unique fingerprint
-
Factory default configuration fingerprint
Front LEDs
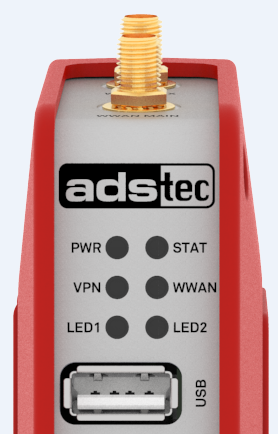
| LED | Signal | Action |
|---|---|---|
| PWR (Power) | The device is not supplied with voltage. | |
| Voltage was switched on, device booting. LED flashes slowly (1 Hz). | ||
| Firmware is being updated. LED flashes rapidly (5 Hz). | ||
| The device is ready for operation. | ||
| STAT (Status) | The device is not supplied with voltage. | |
| Device in commissioning mode | ||
| Error during the boot-up process / recovery image | ||
| VPN | No VPN tunnel is active. | |
| The tunnel activated via VPN key is active. | ||
| WWAN | No mobile radio connection active. | |
| Network search (1 Hz) | ||
| Login declined (2 Hz) | ||
| Firmware update of the radio module (5 Hz) | ||
| Logged in, offline | ||
| Logged in, standby (dial-on-demand) | ||
| Logged in, online |
Legend:
| LED status | Representation |
|---|---|
| Off | |
| Illuminates green | |
| Flashes green | |
| Illuminates red | |
| Illuminates orange | |
| Flashes orange |
Operating-mode related LED status displays
Boot-up
The boot-up process begins as soon as the device is supplied with power. The PWR LED flashes slowly.
Startup
When first put into operation, the device is initially in a special start-up mode until the minimum configuration requirements have been completed. During this time, the status LED flashes green (long – long – off).
Resetting to default settings
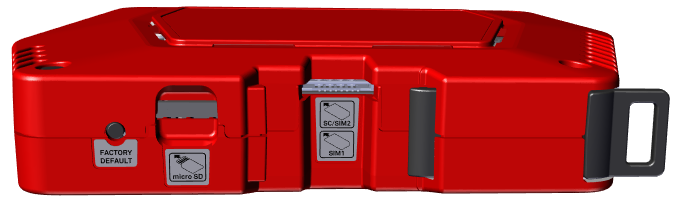 The Factory Default button is used to reset the firewall back to the default factory settings at any time.
The Factory Default button must be pressed prior to the boot-up process and held down for approx. 10 seconds during the boot-up process. The PWR LED flashes rapidly while resetting to factory settings. As soon as the PWR LED illuminates constantly, it is possible to access the web interface.
Firmware update
A firmware update can be performed via the web interface.
-
The PWR-LED flashes rapidly during a firmware update of the firewall. The actual update procedure takes a few minutes. Initialisation begins after the update procedure has been performed successfully. The PWR-LED flashes slowly during this process.
-
During a firmware update of the mobile radio module, the yellow WWAN-LED flashes with a frequency of 5 Hz.